Tracking outbound items in Intelligence 360
Get details about the status of outbound items
Intelligence 360™ provides you with visibility into items shipped from your organization.
How to view outbound items in Intelligence 360
To view your outbound items, organized by the stages of the delivery process, select Outbound from the top menu.
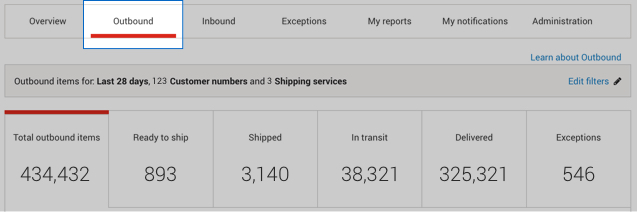
Ready to ship: Electronic information has been submitted by the sender, but items are not yet received or picked up by Canada Post.
Shipped: The item(s) have been picked up by Canada Post or deposited at a Canada Post facility.
In transit – Item is travelling to its destination and will remain in this stage until delivered.
Delivered – Item(s) was successfully delivered.
Exceptions - Items that have unforeseen delivery interruptions
Total outbound items is the sum of the items in all stages of the delivery process.
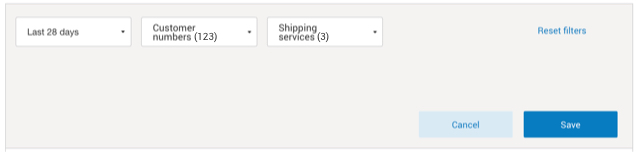
Filter outbound items
Select Edit filters to choose the items you wish to view.

You can filter by timeframe, customer number and shipping service.
Search and download functionality
You can click on the Search icon to view the search bar. Then select an option* from the Search Category drop-down menu.

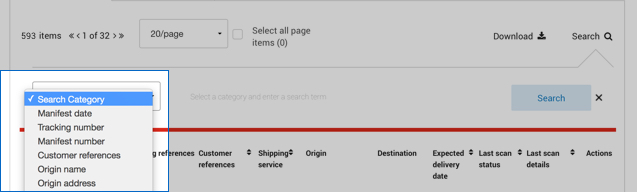
You can also sort outbound items in ascending or descending order by selecting any of the column headings.

*Items in Intelligence 360 contain and can be searched by these details:
Manifest date: Date the electronic manifest was submitted to Canada Post by the organization.
Customer number: A seven-digit number assigned when an organization signs an agreement with Canada Post.
Tracking references: The tracking number and manifest number associated to an item – the origin should be on a separate line.
Customer references: Reference fields 1 and 2 in your shipping system. If these fields are not used by you, they are blank in Intelligence 360.
Shipping services: Parcel shipping services used to send your items to Canadian, U.S. and international destinations.
Origin: The full address where the item was shipped from.
Destination: The full address of the item’s final delivery location.
Expected delivery date: The date the item is scheduled to arrive at its final destination.
Last scan status: Shows the most recent scan an item received
Last scan details: Date, time and location of the last scan an item received.
Actions: Open the three dots to add items to watch list and create email notifications.
You can Download your outbound items in three different formats, PDF*, CSV or Excel.

Only items showing on your screen are downloaded. To view large amounts of information, create a Tracking summary report.

Add an outbound item to your watch list and create a notification
Select the 3 dot menu under Actions. Now you can Add to watch list or Create notification for an item.
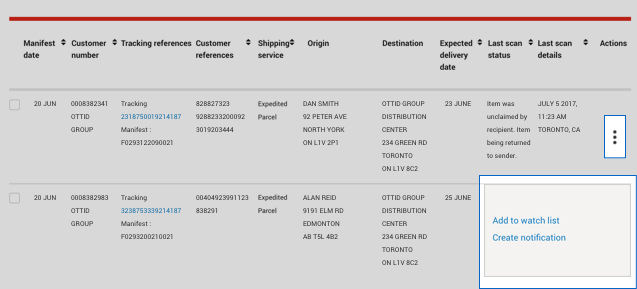
Keep a close eye on your important items by adding up to 20 items to your watch list which can be quickly accessed within the overview screen.
Setup real-time tracking notifications to get an update each time an item moves to the next stage in the delivery process. You can receive notifications directly within the tool within the My notifications page or by email. Notifications can be sent to up to 10 different email addresses.
For an overview of Track 360, read Overview of Intelligence 360.